I currently have an excess of pistachios in the cupboard so thought that I would attempt the Chocolate Pistachio Tart recipe in the Australian Women's Weekly chocolate book as a new year treat.
pastry
1 1/4 cups (185g) plain flour
1/2 cup (80g) icing sugar
125g cold unsalted butter, chopped coarsely
2 tablespoons iced water, approximately
Process sifted flour and sugar with butter until crumbly. Add enough of the water water until ingredients just come together when processed. Knead dough on floured surface until smooth. Cover; refrigerate 30 minutes.
Grease 12.5cm x 35cm loose-based fluted flan tin. Reserve one-quarter of the dough for decoration. Roll remaining dough between sheets of baking paper until large enough to line tin. Ease dough into tin; press into base and sides. Trim edges, prick base all over with fork.
Refrigerate 30 minutes.
Roll out reserved dough on floured surface, cut out 12 x 2cm rounds from reserved dough; place on baking-paper-lined tray. Refrigerate 30 minutes.
Preheat oven to 200C/180C fan-forced.
filling
1/2 cup (70g) roasted unsalted pistachios
100g unsalted butter, softened
1/2 cup (110g) caster sugar
2 eggs
2/3 cup (100g) self-raising flour
1/3 cup(35g) cocoa powder
1/2 cup (160g) raspberry jam
12 roasted unsalted pistachios, extra
40g dark chocolate Melts, melted
Blend or process nuts finely.
Beat butter and sugar in small bowl with electric mixer until light and fluffy. Beat in eggs, one at a time. Transfer mixture to medium bowl; stir in sifted flour and cocoa, and nuts. Spread jam over base of pastry case; top with pistachio filling. Top filling with pastry rounds.
Bake 15 minutes. Reduce heat to 180C/160C fan-forced and bake a further 25 minutes. Cool.
Dip extra nuts in chocolate; place on pastry rounds. Cool before slicing.
Notes
- I have never greased my rectangular flan tin before with shortcrust pastry and never had any problems with pastry sticking. I did it this time though because the recipe said so, just in case!
- In my case I pounded the nuts with our new mortar and pestle, a Christmas gift from M&DC!
- I was too lazy to cut out rounds and ended up with 18 small hearts, since that was the shape of the smallest cutter that I own. Also I didn't bother to reserve dough and used the leftovers from lining the flan tin. I rolled the dough out on the baking paper I had used previously.
- I knew that we did not have any raspberry jam, and I was planning to use homemade strawberry jam from C's mum... unfortunately there was none left! I did pull something out of the cupboard that I had thought was strawberry jam, but it turned out to be a type of jelly - no fruit at all in it! At any rate, that is what ended up on the tart as the only other jam I had was apricot and I thought that the mystery jelly would be a better option.
- It has come out of the oven quite high and cracked. I am not sure, I think it may be dry. I guess I will find out tomorrow! I will add the finishing pistachios tomorrow.
Wednesday, December 30, 2009
Monday, December 28, 2009
Organic Olive Oil
E and I had lunch at Kailis Brothers in Leederville just before Christmas. After we had finished lunch we ducked into the seafood market to have a look! I always like to see what is on offer, especially now since C supplies so much of our fish and seafood. There was an olive oil tasting set up, and it was for Kailis Organic Olive Oils. There were several different varieties, including one that was blood orange infused and another that was lime infused, as well as a standard extra virgin, and all organic! I definitely recommend tasting them if you can. They also supply you with recipes you can use the oils with, the blood orange infused oil seemed to be aimed towards desserts and cakes, and the lime infused towards seafood.
Last Christmas C and I came across the Valley of the Giants Wines and Olives. It was newly opened, a very modern architectural tasting room with lots of lovely timber. We tasted the olives and the olive oil, and were so impressed that we bought a (rather large) jar of their olives as well as a couple of bottles of olive oil! The oil was lovely, no horrible aftertaste that you find with some of the oils.
Olio Bello also offer organic olive oils, and C and I also have some of their product in the cupboard! When we visited the display we got to see how the press worked and taste some of the raw product!
It is so nice to be able to purchase a locally grown product, and for that product to be worth purchasing!
Custard
E gifted me her excess egg yolks, so I thought that I would make some custard to go with the Christmas cakes and puddings that we received for Christmas.
I did a bit of a search, many of the recipes available online were for the thicker creme patisserie; I have subsequently learned that the type of custard that I was after is known as creme anglaise.
The egg yolks themselves were in pairs, and I needed a recipe that either used two yolks or was easily convertible. The recipe that I used as a basis is from cuisine.com.au. It seemed fairly straightforward and I did not even need a calculator to divide the ingredients for 2 egg yolks!
2 egg yolks
1/4 cup caster sugar
200mL milk
1/2 teaspoon vanilla extract
Put milk into a heavy based pan and bring to the boil.
Whisk egg yolks in a glass, heatproof bowl until they change colour. Add sugar and whisk until creamy.
Add the boiled milk and whisk well. Chuck in the vanilla extract.
Place the bowl over a pot of simmering water. The bottom of the bowl should not touch the water.
Stir with a wooden spoon. The custard is ready when the custard thickens and coats the back of the wooden spoon.
Notes
Make sure that there is enough water as I managed to boil the pot dry, luckily I figured out what the strange sound was!
I think I cooked it for far too long. I was expecting the custard to thicken significantly, so I was stirring for over an hour before I finally realised that it was sticking to the back of the spoon. This custard is a pouring custard.
The original recipe used vanilla beans. I substituted vanilla extract. I am not sure of the best point in the recipe to add it - I added it with the milk. I nearly forgot!!
I think that the custard with this amount of sugar is too sweet, and next time I will reduce the amount of sugar I add.
Custard and fruit cake!
Some custard cooking tips from baking911.com and Practically Edible.
Baked Beans
I have had some very tasty homemade baked beans in Melbourne this year, and I would like to try and make my own. I am not so keen on the tinned variety, very artificial gravy and bland texture, and would like to make some of my own from dried beans! A lot of the recipes that I have found call for tinned tomatoes - or even beans - so I will see how I go in substituting fresh tomatoes.
The picture is from a recipe for Boston Baked Beans off The Cook and the Chef. Note the use of tinned tomatoes.
Saturday, December 26, 2009
Christmas
That is Christmas over for another year! This year was a bit different. In our family normally we will all get together in the morning to open presents, then have the family lunch. In this case "we" consists of Mum, Dad, me, E and now C. Yesterday both E and C were working, and I got to Mum & Dad's late, so we did no present opening in the morning and instead it waited until the evening when E had finished work and had come to over. C is still working, I will not see him for another week! That gives me time to sort out his present though...
The family lunch is with my Mum's family, and held either at my parent's house are at my Mum's brother's house. They rotate every year. The lineup changes every year depending on who is in Perth and not working, and it is lovely to catch up with cousins and aunts and find out what has been going on! Yesterday there were nineteen of us for lunch, probably the largest group that we have had for a few years.
When E came over she started pulling parcels out of her Christmas sack (that is, a green shopping bag!). There were a large number with my name on it. This is very exciting however I only had one with her name on it and was starting to get a bit concerned. Her presents for me were lots of smaller, useful items, and it was lovely to open them one at a time.
Two food related items that she gave me are the heart shaped cutters, and the Donna Hay Cupcake Papers. The cutters came with a note from E saying that they could be used for C's & my engagement party, and I believe that she offered to make heart shaped shortbread for the party. That would be awesome! The cupcake papers are also really sweet, it seems a shame to actually put cupcakes into them.
I also learnt yesterday that David Jones has a better collection of baking items than I believed. I have noticed recently that they stock a range of Wilton baking items in the general kitchen area, and E said that there are more and varied items further within the food court section. I shall have to investigate, but perhaps after the craziness of the post-Christmas sales has died down!
E has also given me the rest of her egg yolks, hopefully they are still okay and I will make some custard with them later to go with the Christmas cakes and puddings that we have been given!!
Friday, December 25, 2009
You can't catch me, I'm the Gingerbread Man!
Gingerbread men are all iced and ready to go... I have to confess that I lost patience at the end; I actually had more white icing than any other colour but ended up with the least amount of white icing on the biscuits!
Maybe next time I will decorate them all the same...
Hmm, looking at my efforts this year, in a rush and on my own, compared to the decorating of E and I a couple of years ago... standards have slipped!
I tried using snaplock bags this time, I usually use baking paper and sticky tape. The sticky tape that I have does not actually stick to the baking paper so by the end of it the icing is oozing out everywhere! That was not a problem with the bags, however I found it difficult to actually get the icing out and onto the biscuits! I will have to keep searching for a better method of icing the biscuits. Perhaps I should buy an icing pen, or maybe I should just spread it on with a knife...
They went down well today with my cousins, and there were none left to bring back home for Mum! Luckily we left some at home...
Thursday, December 24, 2009
Run, run as fast as you can!
Christmas time, and it is gingerbread man time! This is becoming a Christmas tradition, I think this will be the third year in a row that I have made gingerbread for Christmas Day!
The first year my sister E and I made them, and we had lots of fun decorating them! The first rack shown left are some of the efforts of 2007. Last year Mum asked me to make them again, and one of her requests was to make smaller sizes. I spent a few hours on Christmas morning decorating them, and decided that larger sizes were much, much better (and quicker to decorate!).
This year, Mum has put in a special request for extras for their annual friends barbecue, and C has also asked for some to take down south to Peaceful Bay when he goes camping, as we took the leftovers last year and they were a hit!
The recipe that I use is very simple, it is from the Australian Women's Weekly! I am fairly sure that it is the same recipe as was in the "AWW Beautiful Biscuits" cook book, that K3 and I used back in high school to make gingerbread! At least, I hope it is, because that is the recipe that I was searching for.
Anyway, here is the recipe, with my notes.
125g butter
½ cup (100g) firmly packed brown sugar
1 egg yolk
2 ½ cups (375g) plain flour
1 teaspoon bicarbonate of soda
3 teaspoons ground ginger
½ cup (125 ml) golden syrup
Beat butter until it lightens in colour, then add the sugar and cream. Add the egg yolk and beat until combined.
Sift dry ingredients together. Mix into the butter mixture with the golden syrup and bring together. I tried to mix mine in with the mixmaster today until it started jumping out of the bowl. At that point I tipped it onto a large wooden chopping board that I had dusted flour over. I wore a glove to knead to keep the heat of my body off the gingerbread and to keep my hands clean!
I put it into the fridge to help make it easier to roll, as the dough was quite soft.
About now is a good idea to preheat your oven to 180C! By the time you roll out the dough and cut all of the shapes it should be heated!
Roll out between 2 sheets of baking paper until approximately 3mm thick. Cut gingerbread shapes from the dough and place on baking paper in biscuit trays. Bake for 10 minutes or until lightly golden.
I would like to point out too that the different sized biscuits will cook at different rates, it usually takes me a few trays to remember this and so the larger biscuits will be perfect texture and the smaller ones will be hard!
Reroll dough as many times as necessary. Cool on trays.
1 egg white
1 ½ cups pure icing sugar, sifted
For the icing, make sure that you use beaters to properly beat the egg white to peaks then gradually add the icing sugar. I made this once and I did not think it clear in the recipe - so I just used a wooden spoon. The icing did not set properly!
Divid icing evenly into bowls and tint as desired. Keep bowls covered when not using the icing. Spoon icing into a piping bag and decorate biscuits as desired.
Monday, December 21, 2009
Sink or save, or what to do with excess egg yolks!
One issue that I have not had to deal with is what to do with excess egg yolks. I usually try to pick recipes that use whole eggs, or make two recipes with a balanced number of each. I do like to make custard, and have been collecting egg whites in the freezer! I figure that they will be easy to use, in a pavlova or meringue, or friand, or any number of light and fluffy desserts.
Coincidentally, both my sister E and soon to be sister-in-law K2 both made desserts this weekend involving egg whites!
When I spoke to E on Saturday she had made pavlova, and had stored the egg yolks in Tupperware in the fridge. I offered to take them off her hand to make custard, although I forgot to take them home! She said that she usually makes an egg yolk omelette with them if she cannot find a use, so they do not go to waste.
K2 on the other hand had made an Angel Cake from a recent edition of the Donna Hay Magazine, this recipe required 12 egg whites! She had ended up pouring her egg yolks down her sink.
I realised that I did not know whether or not you could freeze egg yolks. I have had no problems freezing and then using egg whites - I just leave them out overnight on the bench and they thaw to room temperature for good whipping!
Egg yolks on the other hand... to google I must go! I checked out a few different sites, and they all seemed to agree that you should mix the egg yolks with either salt or sugar to prevent them becoming gelatinous. I really am not sure what a gelatinous egg yolk will look like, or how it affects it in the cooking, but I am prepared to accept the word of the learned people at the CSIRO!
The consensus seems to be that for six egg yolks (or eggs), a teaspoon of salt or one tablespoon of sugar is the ratio. The salty yolks can then be used in savoury dishes, or the sweetened ones can be used in desserts! Also, labelling the container with sweet/salty is advisable. I have started labelling my freezer containers as it is too difficult to remember what is in them, and also awkward open each container to try and find what I am looking for!
Another tip that I picked up from reading, regarding egg whites, is to freeze them in ice cube trays. I may try that next time, as I currently freeze my whites in sets of three and this means that I may have to adjust quantities when using them in recipes!
Sunday, December 20, 2009
Christmas cooking
We are having C's family over for Christmas lunch today, early since C is going back to work on Christmas Eve and will not be around. For dessert I have made Praline Semifreddo, out of the Sweet Food cookbook. It seemed pretty straightforward, and I guessed (correctly!) that the weather might be very warm and a frozen dessert appreciated.
The most complicated part of the recipe was making the praline. I was a little nervous about melting sugar in a pot over the stove. I had one experience when I was at school and I managed to burn one of my mother's pots so badly that it was thrown away! The recipe said to tip the sugar from side to side to allow it to heat evenly. I found that there were clumps of melted sugar that formed, and I was worried that I had wrecked the sugar - and possibly the pan! Still, I persevered, and eventually all of the sugar dissolved and I had a nice liquid.
One thing that I did not realise, not having done it before, is how quickly the sugar set once the heat was taken away, so I needed to work very quickly after adding the almonds to mix it all toghether and lay it on the greased baking tray to set. Next time I will work a little more quickly, as I think I could have utilised more of the toffee if i had been quicker.
I had wanted to find a recipe for a biscuit to have with coffee. I had visions of a vanilla flavoured biscuit, vaguely round in shape and covered in icing sugar. I was quite unable to find what I was looking for, and ended up settling on a recipe for a Greek Almond Biscuit. It was perfect too, as it meant that I could use some of the frozen egg whites that I had left over from my custard making efforts!
As these things go, I did not check the amount of almond meal that I had until after I had partially defrosted the egg white, and the amount left meant that I needed to find an alternative recipe. I found a recipe for Italian Choc Hazelnut Cookies on Best Recipes. I am usually reluctant to try a recipe from an unknown source, preferring sites such as the Australian Women's Weekly or Exclusively Food, however I was running out of time! The recipe seemed straight forward and I was taken with the idea of leaving them in a warmed oven overnight to cook, rather than having to cook them for several hours as most of the meringue recipes required.
Constructing the mix was fairly straight forward. I had a packet of hazelnut meal in the pantry, and chopped the chocolate rather than processed it as I did not wish to make another appliance dirty - it was around 11:30pm!
3 egg whites
125g dark chocolate, chopped (I used Cadbury Old Gold)
125g hazelnut meal
1/4 cup caster sugar
Preheat oven to 160C and line a tray with baking paper.
Place egg whites into mixer and beat.
Once soft peaks start to form add sugar in slowly, taking care to retain a shiny appearance to the egg whites.
Fold chocolate and hazelnut meal into egg mixture until well combined.
Use a dessertspoon to place dollops of mix onto tray and place into oven.
Turn oven off and let residual heat cook the biscuits (may take a few hours).
This morning when I opened the oven, I was disappointed that the biscuits were still quite wet - they tasted lovely but did not hold together when lifted off the try - they obviously had not had enough heat! I thought that maybe my oven did not hold heat as well as the person who had posted the recipe, so as I type the biscuits are back in the oven, waiting for it to cool down. I figured I would try the same technique a second time and see how it goes!
Recooking them has led to a harder, browner biscuit. I think perhaps the biscuits could be smaller and the suggested cooking technique of the original recipe may work. Also that would mean nicer, bite sized biscuits to have with a cup of tea. Heaven!
Thursday, December 17, 2009
Update on fruit mince pies...
I made the rest of the fruit mince pies a la Donna Hay. I only made a dozen on Monday and another dozen tonight. A few more notes regarding the recipe:
So, next time I need to use a larger cutter, since the filling all bubbled over the sides!
And finally.... mmmmmmm-yum!
PS Did I say YUM???!
- I used a 68mm cutter. The recipe called for 70mm. My pastry shrank into ovals once I had put it into the tray!
- When I had filled all twelve holes I put the tray and pastry into the freezer, in the hope that it would stop the pastry shrinking further.
- The recipe said it made 22. I made 24.
- I had about a tennis ball sized amount of pastry left over each session, after using the recipe to make 350g.
So, next time I need to use a larger cutter, since the filling all bubbled over the sides!
And finally.... mmmmmmm-yum!
PS Did I say YUM???!
Purple Jasmine Rice
I am back working at the west end of the Perth CBD, at least for the moment, and on Monday on my way to catch the bus home I walked down Hay Street and visited one of my favourite shops, the Oxfam Shop! I always love going into the shop, and seeing what interesting and unusual goods that they have. Oxfam are supporters of fair trade, and from the Oxfam Shop website "Oxfam Shop is a passionate supporter of fair trade and deals on a fair trade basis with 85 fair trade organisations around the world, who support thousands of producers including Indigenous Australians".
This time around I was caught by the rice that they were selling. They had two flavours on offer, Coral Rice and Purple Jasmine, from Alter Eco. The rice intrigued me, and eventually I settled on the purple rice. As you can see it is a mix of colours, at least uncooked. [add photo]
I followed the cooking instructions on the back of the packet, and ended up with lovely cooked rice. There is a bit of texture, the rice is not completely soft, and most startling of all is that the rice is all coloured purple! There was no spectacular taste difference from standard rice, but I really liked the texture and it is quite different from the basmati that we normally eat.
[photo]
For those of you who are not aware, the Oxfam Shop sells fair trade products, and I like to add their food stuffs to my pantry where I have the need. I make sure that I buy fair trade coffee for my guests, and we have several Oxfam branded salt and pepper grinders that we regularly use in our cooking. Occasionally I treat myself to a fair trade chocolate bar or chocolate coated coffee beans (yum!) and I am sure that there is some fair-trade organic drinking chocolate floating around in my tea drawer. Some of the teas that I buy are fair trade, but probably not enough.
I read also today in my local paper that there is a Fair Trade store called U-chus open in Victoria Park, so I shall have to try and visit there soon and see what alternative products they have.
[links - fair trade, , photos]
Tuesday, December 15, 2009
Storing recipes
One of the things that I played around with was how best to store hard copies of the recipes that I use. I have a collection of newspaper cutouts, photocopies and hand written recipes from friends and off TV shows.
I played around with a few methods.
First was to take a notebook that a friend had given me and write in the recipes myself. I also stuck in recipes that had been emailed to me by friends. I found that the spacing on the pages was too big (they were ruled pages!) and writing the recipes out somewhat tedious. Also, since I wanted the recipes to be catalogued somewhat, it meant that I had to guess at where in the book to put the recipes. I found that I was not using it, so I tried to think of another idea.
One of my friends gave me a Recipe Book from Kieanna Stationery. It seemed like a nice idea and a practical way to collate everything. I copied a few recipes into it, but I found that I didn't use it, and the lines in the recipe sheets were again spaced too far apart. It would also mean that I would have to buy specially sized sheets - or make my own - once the ones that were supplied with the book had been used.
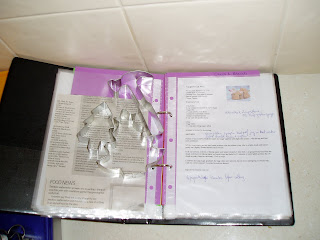
What I have settled on is to use an A5 file with plastic sleeves for the recipes and dividers that I made myself out of coloured card. I have decided to have the following categories, coloured to match the card! [photo, and insert headings]
I have two files, one for storing the recipes that I have collected, and the second one with the recipes that I have actually tried. That is the collection that is catalogued. Many recipes now are taken from online sources, and for these I have created a MS Word template to copy them into so that I can print at A5. I make sure that I reference the source of all recipes.
I use the sheets to write notes and additional information on the recipes. This is useful so that the next time I use the recipe I can learn from the past!
Here is an example of the book in action for gingerbread men.
I still have to design myself a cover sheet, the handwritten cover page is a little preschool. I mean I didn't even rule lines to make it even!
I would like also to start taking photos of the food that I make, so that I can include them into the A5 recipe sheets.
One thing that I have not thought about is how I should record the recipe failures! I have had a few... and not just because of my cooking.
Monday, December 14, 2009
Donna Hay Fruit Mince Pies
Fruit mince pies are one of my favourite foods! I always look forward to Christmas and getting to eat fruit mince pies. I bought some pies from my local bakery recently, and was disappointed, as they were more pastry and not enough fruit mince! (Take note, this it my personal preference, as I love fruit cake and fruit mince. I know that others will prefer there to be more pastry!)
I thought that I would give it a go to make some fruit mince pies, and I have a few recipes in my collection of books. The recipe I used was from Donna Hay Simple Essentials: Christmas. I essentially followed it, modifications explained below.
First of all I made the fruit mince:
1 large apple, peeled, core cut out and grated
1/3 cup sultanas
1/4 cup raisins (the recipe called for candied peel. Yuck.)
1/3 cup currants
1/3 cup slivered almonds
1/2 cup brown sugar
1 teaspoon mixed spice
30g butter, melted
2 tablespoons sherry
Mix well, cover and refrigerate for 24 hours.
I have to confess that I am not very good at following instructions to the letter. So, I omitted the candied peel and substituted raisins. I am pretty sure that I put more butter and sherry in that was recommended. As well, I made the fruit mince on Saturday and it is only tonight, Monday, that I have actually made some of the pies.
So, to the pastry. The recipe calls for 700g of store bought shortcrust pastry, or use the recipe included in the book. The shortcrust pastry recipe makes 350g, and the quantities to me seemed more than sufficient for making 22 pies. In this instance I made only one quantity of pastry.
Process 2 cups plain flour with 145g butter in a food processor until the mixture resembles fine breadcrumbs. With the motor running, add enough iced water to form a dough. Knead lightly then wrap in plastic wrap and refrigerate for 30 minutes.
I was a little sketchy about the amount of water needed, and my (borrowed from Mum!) food processor is a little gutless so I was worried that I might burn it out! I ended up not waiting until the dough balled, and instead turned it onto a floured chopping board to bring it together.
One thing that I like to do when working with pastry is to use a glove (or gloves). These disposable gloves protect the hands but also help to keep the heat off the pastry. Magic!
The pastry is then to be rolled to 2mm thick. I used a 78mm biscuit cutter to cut rounds that I then put into a patty tray. When I had filled them up I placed the tray into the freezer to help rest the pastry while I made the stars! While I was working with the pastry it seemed quite elastic, and it was really difficult to roll. I don't know if this is because I have overworked the pastry or if it is because I did not put enough water in. I shall have to see how the pies turn out.
Once I had made the stars, I pulled the pastry out of the freezer and put the filling into the pastry cases. The stars went on top, and were brushed with beaten egg and sprinkled with caster sugar.
I cooked them for 14 minutes at 170C in a fan forced oven - I usually drop the temperature around 10C from a recipe for the fan force.
I have pulled them out of the oven, and sampled. The pastry was nice and light and a little crisp, so very nice. Quite different from the heavier pastries of the bought pies, that was maybe because my pastry was rolled so thinly.
I used half of the pastry that I made to make 12 pies, with leftovers in the bin. So I do not know what you would do with the 700g of the original recipe. Perhaps my idea of 2mm is different from what was intended.
I am hoping that they will still be crisp in the morning, and that the fruit mince will not make the pastry soggy!!
Why food?
One of my favourite pasttimes is eating! That is one good reason for me to do a lot of exercise...
The idea for this blog is to talk about food! Recipes that I try and notes for those, as well as restaurants and fresh food out of my garden.
When I still lived at home, I thought that a garden would be too much effort, and always thought that I would want something "easy care". When I moved into my first place, there were some simple roses and a few herbs and a lemon tree. Now, I had always thought that roses were difficult to look after, but I have found that they do not really want for much. You have to water them occasionally, treat them for black spot and prune them. I haven't had to do too many things else!
At some point along the way I picked up a real appreciation of fresh food, and now, in my second place, we have pulled out most of the plants that do not produce something edible and the back garden has grown and is growing all sorts! Peaches, lemons, mulberries, lime and mandarin, strawberries, leeks, tomatoes, herbs, spring onions... so many to list!
Subscribe to:
Posts (Atom)